AdBlock is a popular browser extension that blocks ads, pop-ups, and other unwanted elements while you browse the internet. While it can greatly enhance your browsing experience by removing distractions, it can also create problems if you’re trying to access content that relies on ads for revenue. In such cases, you may want to temporarily disable AdBlock on a specific page. This can be done in just a few steps, and in this article, we’ll show you how.
Before we get into the steps, it’s worth mentioning that AdBlock is available for various browsers, including Chrome, Firefox, and Safari. The steps to disable AdBlock may vary slightly depending on the browser you’re using, but the overall process is similar.
Step 1: Identify the AdBlock Icon
The first step in disabling AdBlock is to locate the AdBlock icon in your browser’s toolbar or address bar. The icon is usually easy to spot, as it resembles a stop sign with the letters “AB” in the center as shown in the picture below.

Step 2: Open the AdBlock Menu
Once you’ve located the AdBlock icon, click on it to open the AdBlock menu by clicking on the extension icon. This menu will provide you with various options, including the ability to disable AdBlock on a specific page.
Step 3: Select “Once / Always”
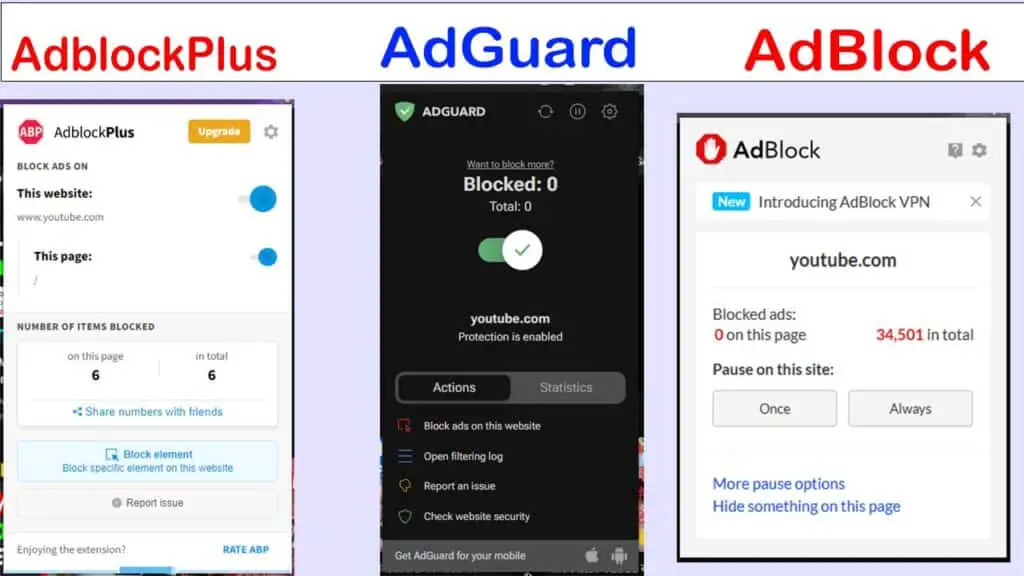
- Note: All Adblockers have different options in their menu the picture below shows all popular extensions and their different menus.

- Different AdBlockers with their menu options
- For this article, I am using AdBlock Extension
From the AdBlock menu, select the option that says “Don’t run on this page”, “On this page”, or ” Once / Always”. This will prevent AdBlock from blocking ads on the current page. You’ll be able to see all ads and pop-ups as if AdBlock wasn’t enabled.
Step 4: Refresh the Page
If you had AdBlock enabled before you disabled it on the current page, you’ll need to refresh the page for the changes to take effect. This can be done by clicking the refresh button in your browser or by pressing the F5 key on your keyboard.
Step 5: Re-enable AdBlock
Once you’re done with the page and want to go back to ad-free browsing, simply click on the AdBlock icon and select “Enabled on this site”. AdBlock will then be re-enabled, and you’ll once again enjoy an ad-free browsing experience.
It’s worth noting that disabling AdBlock on a specific page won’t permanently change its status. The next time you visit the page, AdBlock will be enabled again. If you want to always disable AdBlock on a specific website, you’ll need to repeat the steps above each time you visit the site.
Why You May Need to Disable AdBlock on a Specific Page
There are several reasons why you may want to temporarily disable AdBlock on a specific page. One common reason is to access content that relies on ads for revenue. Many websites, particularly those in the media industry, rely on ads to generate income and fund their operations. If you’re trying to access an article, video, or other content on such a website and AdBlock is enabled, you may not be able to access the content without disabling AdBlock.
Another reason you may want to disable AdBlock on a specific page is to support your favorite websites. By disabling AdBlock, you’ll be allowing ads to be displayed, which in turn helps to generate revenue for the website. This can be a great way to support websites that you love and rely on, especially if they’re small or independent operations that don’t have a lot of resources.
In some cases, you may also want to enable AdBlock to access certain features on a website. For example, some websites may require you to view an ad before accessing a feature or video. If AdBlock is enabled, you can disable it by clicking on the AdBlock extension and then clicking on the pause on this site option to reenable it.


